
Crostata de pomi (apple tart)
Servings
8
servingsPrep time
1
hour30
minutesCooking time
40
minutesResting time
12
minutesCrostata is believed to be one of the oldest desserts in Italian pastry tradition, and it was in the early 11th century that it started to gain some recognition in Venice. Around that time, a recipe for this buttery treat was introduced.
And, despite the humble ingredients, it’s still one of the best wintery Venetian desserts, bringing so much joy around the table – even better if served with a dollop of mascarpone on the side.
Ingredients
- Pasta frolla
220g plain flour
15g corn flour
120g unsalted butter, at room temperature
95g icing sugar
2 egg yolks
½ tsp vanilla extract
Zest of 1 lemon
A pinch of salt
A splash of cold water (if needed)
- Apple filling
1 kg apples, peeled and sliced
75g caster sugar
Zest of 1 lemon
A pinch of salt
Red food colouring (optional)
Directions
- Pasta frolla
- Add the soft butter and icing sugar to a bowl and beat together until light and fluffy.
- Combine the egg yolks, vanilla, lemon zest and salt and stir until dissolved.
- Add the yolk mixture to the butter and sugar and continue to mix until fully incorporated and you achieve a smooth cream.
- Sift the flour and corn flour together and add one third to the butter and egg cream. Using a wooden spoon or a spatula, start to incorporate the flour ensuring no lumps form. Add the remainder of the flour and mix with the spoon until it comes together to a soft pastry.
- If it’s looking too dry, add a splash of cold water to finally bring it together. Fold the pastry a couple of times with your hands to form a ball. Flatten the ball on a piece of cling film, wrap and refrigerate for at least two hours, ideally overnight.
- Apple filling
- Put the apple slices in a pan alongside the sugar, lemon zest and a pinch of salt. Cook them in their juices for roughly 20 minutes. They should not be fully cooked and still retain some crunch.
- Add a few drops of red food colouring to the apple filling. Mix and set aside.*
- Assembling and baking the tart
- Pre-heat the oven at 180°C. Take the pastry out of the fridge and leave it at room temperature for 10 minutes before working it.
- In the meanwhile, take a 20cm tart tin and coat the inside with butter and flour. Roll out half of the pastry to a 6mm thickness, cut a 20cm diameter disc and lay it on the bottom of the tin, as the tart base. Reserve the pastry scraps.
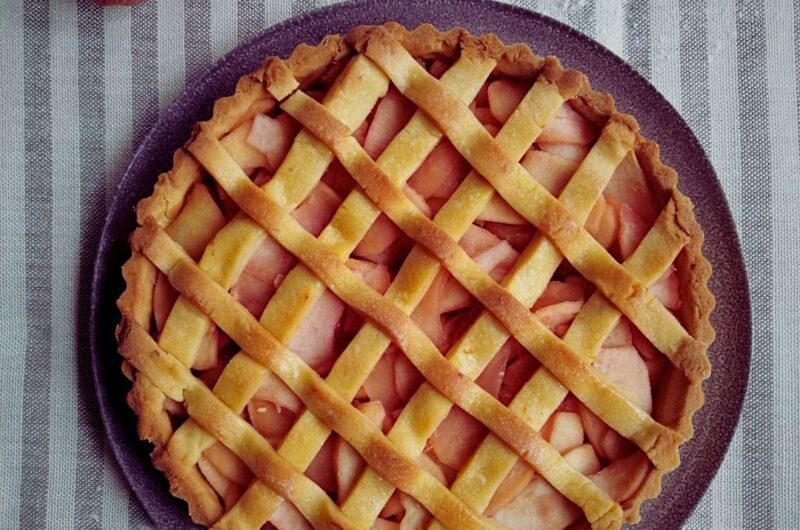
- Take the other half of the pastry and, using your hands, form a 2cm thick and long log. Pick it up and lay it inside the tart tin, all along the border. Trim the two ends so they perfectly connect with each other and save the rest of pastry for the decoration. Using your fingers or a piece of pastry, press the log against the border of the tin to flatten it and create the sides of the tart. Using a small and sharp knife, trim and overhanging pastry and make holes all over with a fork to keep the tart flat while cooking.
- Put the cooked apples into the tart. Bring all the leftover pastry together and roll out to a 6mm thickness. Using a straight object as a guide, cut as many long strips as you can fit (thick or thin is up to your liking) and lay them to decorate the top of the tart with a criss-cross pattern.
- Transfer the cake to the fridge to set for 15 minutes before baking. Bake over a metal tray for 40 minutes at 180°C. Cover with foil for the last 5-10 minutes if you notice it’s browning too quickly.
- Once baked, take the tart out of the oven and leave to cool completely before unmoulding. Spray or brush some clear gelatine or apricot glaze over the pastry top and enjoy.
Notes
- *Traditionally, the filling would also be coloured with Alchermes liqueur (widely available in Italy, but not so much outside the country), which is characterised by its intense red colour, obtained by the addition of kermes, a small scale insect from which the drink derives its name.